

Deep fat above the fascia builds projection; shallow fat smooths hip dips. Layer beats volume.
Published -
Updated -

Author
Wi Young-jin · Chief director
Seoul National University College of Medicine · Seoul National University Hospital Specialist
→
Hip filler consultations tend to circle the same three topics: how many syringes, how much it costs, and whether the two sides will match. The one that rarely comes up is depth. Yet the same product at the same volume gives you a noticeably different result depending on which layer it goes into. Whether you end up with a rounder, lifted shape or a smoother surface line is decided right there, in the layer planning.
Hip tissue is far thicker than facial tissue, stacked from skin down to muscle. So the layer you choose governs not only how much projection you get, but how natural it reads, how long it holds, and how safely the injection can avoid the vessels running through the area. This article walks through why layer planning matters and what actually changes when it shifts.
This article is general information from Beautystone, a skin clinic in Hapjeong, Seoul.
What you will learn
Which layer hip filler goes into among skin, fat, fascia and muscle
How deep and shallow placement split between volume and surface contour
How layer choice affects both how natural it looks and how long it lasts
Why avoiding vessels safely starts with the layer decision
Hip tissue is layered, so placement comes first
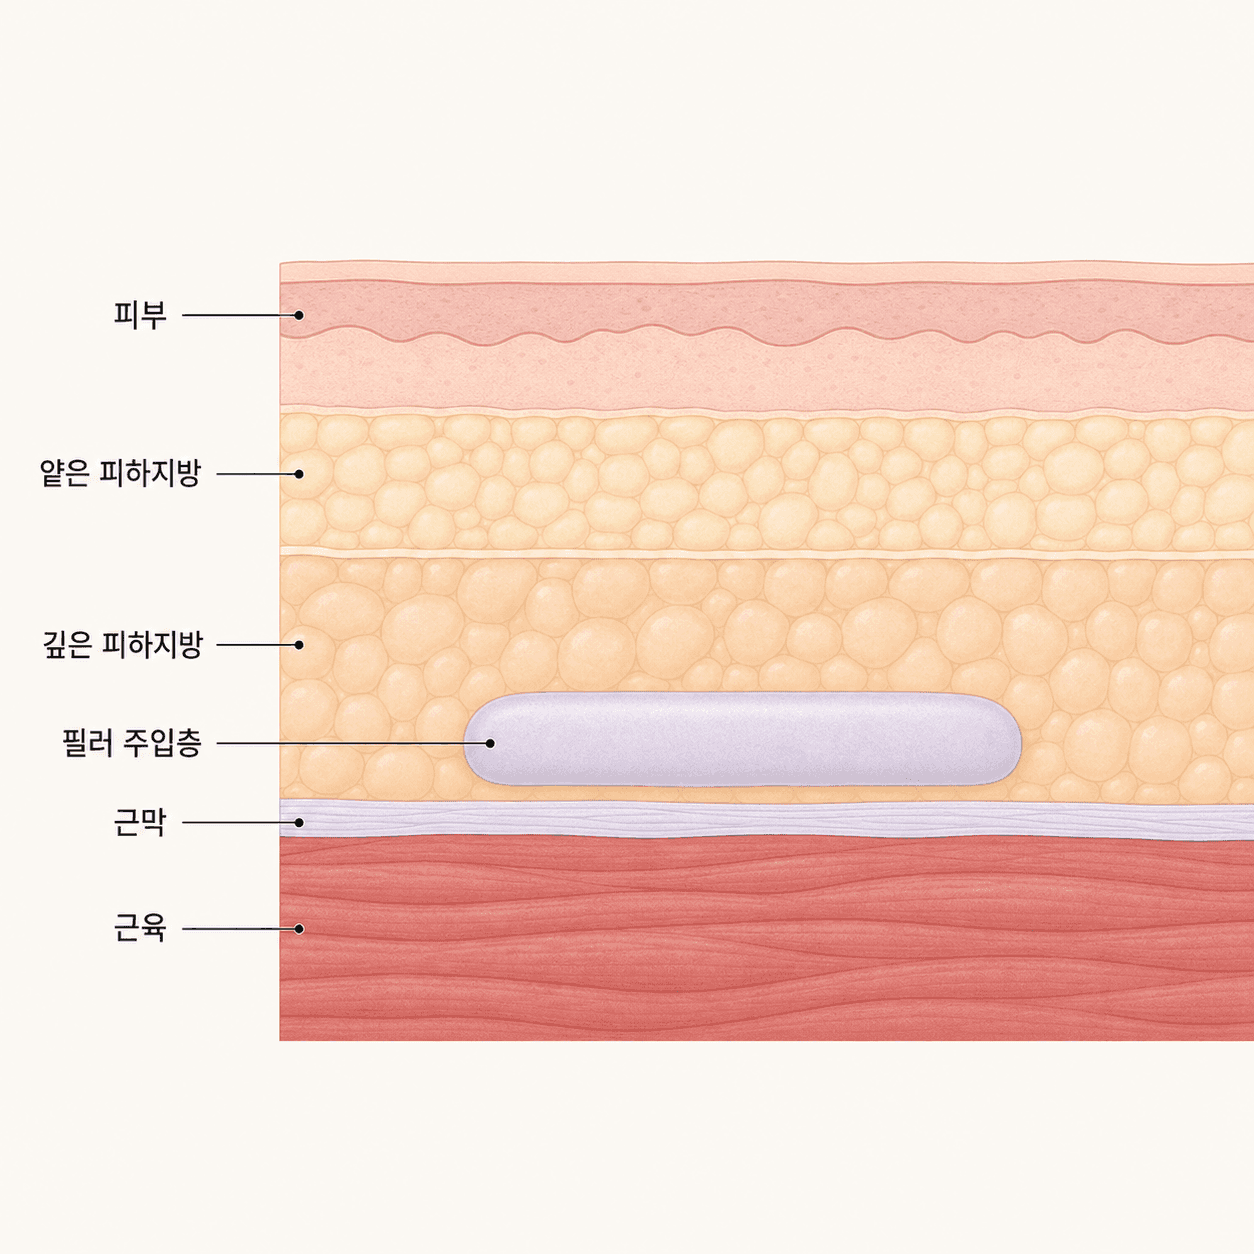
From the outside the hip looks like one mass. Inside it is stacked: skin, subcutaneous fat, fascia*, then muscle. Filler placement is planned within the fat, and the precise depth inside that fat is what gets designed. Facial filler is mapped in millimetres. The hip, with far more tissue to work with, is easier to think about in two larger compartments, deep subcutaneous fat and superficial subcutaneous fat. One regulatory note first, if you are reading from the US: hyaluronic acid fillers there are FDA-approved for specific facial indications, and the FDA has warned against using dermal fillers for large-scale body contouring including the buttocks, so this is not an approved use in the United States.
Fascia*: the thin, tough sheet wrapping the muscle. In the hip, the fat layer sitting on top of this sheet acts as the reference line that supports filler stably.
Deep subcutaneous fat sits directly above the fascia, so it pushes tissue upward from below with real force. Superficial subcutaneous fat sits close to the skin and is better suited to smoothing surface irregularity. Published work on non-surgical gluteal augmentation describes placing filler in the deep subcutaneous plane above the fascia rather than in superficial fat, and using a more superficial fat layer when the goal is surface work such as hip dip contouring, which makes the principle explicit: the layer follows the goal. That is why a consultation starts by asking what you actually want, projection or a smoother line, rather than how much you want to buy.

Deep and shallow are aiming at different things
With the same hip filler, deep and shallow placement chase different outcomes. Deep handles structural volume, shallow handles surface contour. Neither is the better option in the abstract. They get used separately or together depending on what you are after.
Layer | Main goal | Projection | Tends to last | Character |
|---|---|---|---|---|
Deep subcutaneous fat, above fascia | Structural volume, lifted hip line | Greater | Comparatively longer | Pushes up from below for a rounder shape |
Superficial subcutaneous fat, near skin | Surface contour, hip dip correction | Smaller | Can be relatively shorter | Softens an indentation |
Both layers combined | Volume and line together | Moderate to greater | Varies by area | Layers assigned by purpose |
The deep layer supports tissue across a broad area, so it is the one that lifts the overall silhouette. The superficial layer sits close to the surface, which suits filling a localised dip such as a hip dip. The trade-off is that superficial placement carries slightly more risk of a palpable edge or visible surface irregularity, so product choice and volume per pass get handled more conservatively there.

Layer drives how natural it looks and how long it holds
Layer planning matters because it feeds straight into whether the result reads as natural. Put filler only in the superficial layer where volume was needed and the surface can look uneven or feel edged. Put it only deep where a line needed smoothing and the correction you wanted may not show at all. So layer design is as much a question of where as of how much.
Duration responds to layer too. The deep plane sees less movement and pressure, so filler there tends to hold position more stably, while the superficial plane takes more of the load from sitting, lying down and friction. A study that followed hip filler placed in the subcutaneous plane with ultrasound over one year found the product stayed in that plane without migrating, with no serious adverse events, which suggests that accurate placement in the right layer helps both retention and stability. Comparing how the layers behave relative to one another looks roughly like this.
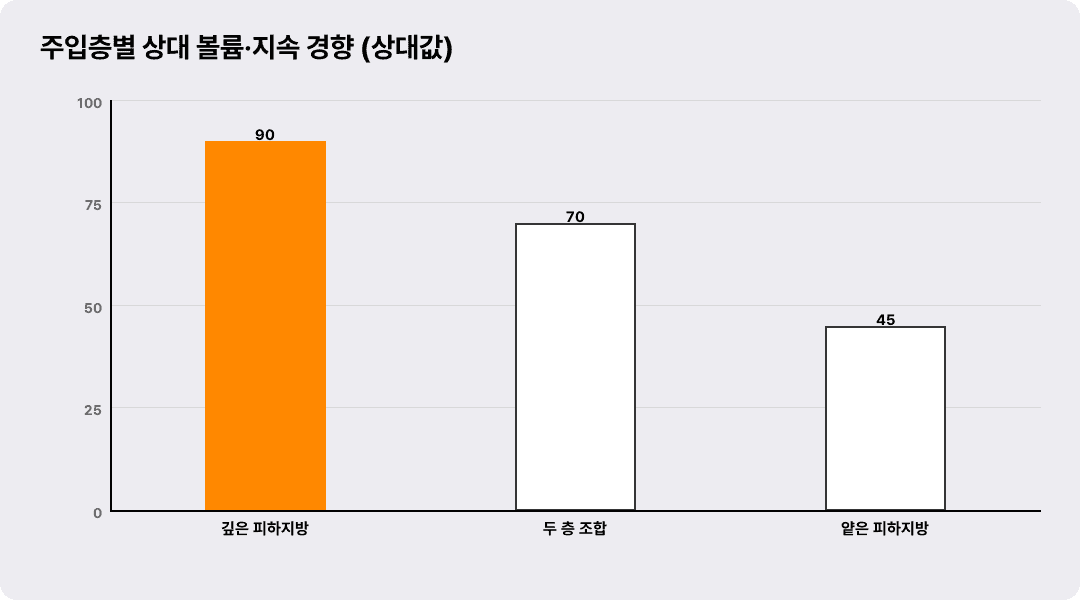
These are relative comparisons between layers, not a promise of a specific number of months. Actual duration shifts with product type, volume, your own tissue and your daily habits, and individual results vary, so treat any estimate for your own case as something to confirm in consultation.

Avoiding vessels starts with the layer decision
Large vessels and nerves run through the hip, so layer planning is a safety question as much as an aesthetic one. Because the significant vessels travel inside the muscle and below the fascia, the general safety standard is to keep filler in the subcutaneous fat above the fascia rather than pushing beneath it. Defining the layer clearly and staying inside it is what keeps vascular risk down.
Instrument — a blunt-tipped cannula* is often used so it pushes vessels aside rather than piercing them
Technique — small increments with the layer rechecked along the way, rather than one large deposit
Plane — the fat above the fascia is the reference, and the muscle and vessel layers below it are avoided
Symmetry — alternating sides so balance and depth are matched together
Cannula*: a blunt, rounded injection tube. Unlike a sharp needle it tends to push tissue and vessels aside rather than pierce them, which helps reduce vascular injury risk over a broad treatment area.
Safe hip filler, in the end, starts with deciding up front exactly how deep you are willing to go. Wandering across layer boundaries in pursuit of more projection may produce volume, but it raises risk in the same motion, so the discipline is to pick the layer that matches the goal and work precisely inside it.

Why the provider you choose still matters
The habit worth looking for is a clinic that settles which layer and for what purpose before it talks volume. Whether you want a rounder lift or a smoother hip dip line changes how deep and superficial placement get weighted, and that reasoning should be explained before anything is injected rather than after. At Beautystone, a small clinic a short walk from Hapjeong Station in Seoul, the layer plan is matched to your own hip shape and tissue thickness. If you are travelling for this, plan for aftercare where you live: hip filler has a recovery window, and if something needs reviewing after you fly home, it will need a provider local to you.

Normal reactions versus signs worth a second look
Mild reactions in the first few days after hip filler are common. Most settle on their own without any intervention.
Swelling and a heavy ache at the injection site — usually easing within about 2 to 3 days
Light bruising — can linger a few days around the cannula entry points and fades gradually
An odd awareness when sitting — noticeable for the few days it takes the filler to settle
The two sides feeling slightly different — usually evens out as swelling subsides
These signs, on the other hand, are worth raising with the clinician who treated you.
Swelling on one side only, or pain that keeps escalating
Skin turning pale, dusky or dark in patches — this can signal a blood flow problem, so contact your provider immediately or seek urgent care
Fever, severe redness or spreading warmth — these can signal infection, so seek urgent care rather than waiting it out
A firm lump that stays palpable over time
Because the hip is a thick, broad area, the layer design ends up shaping both the result and the safety margin more than the injection itself does. This is general educational information rather than medical advice, so the right layer plan for your own anatomy is a decision to make with the clinician who has examined you.
Frequently asked questions
Q. Does hip filler go directly into the muscle?
A. Generally not. Larger vessels and nerves run inside and below the muscle layer, which raises risk considerably, so the standard is to keep filler in the subcutaneous fat above the fascia. Projection is built from that deep fat plane by pushing tissue upward from beneath.
Q. Does deeper placement always last longer?
A. The deep plane sees less movement and pressure, so it does tend to hold more stably. That said, duration also depends on product type, volume, your own tissue and daily habits, so layer alone does not settle it. For an estimate that applies to you, confirm it in consultation.
Q. If I only want my hip dips filled, does it still need to go deep?
A. For a localised surface indentation like a hip dip, the superficial subcutaneous layer is often the better fit. Surface contouring points to the shallow layer, overall projection points to the deep one, and the two get assigned by purpose. If you want both, the layers can be combined.
Q. What happens if the layer is wrong?
A. Filler placed only superficially where volume was needed can look uneven or feel edged, and filler placed only deep where a line needed smoothing may not deliver the correction you wanted. That is why picking the layer that matches the goal, then working precisely within it, does most of the work.
Content





skin
Why Does Fractional CO2 Take Longer to Heal?

Contouring & Volume
How Many cc Does Forehead Filler Need?

skin
Why Is My Skin Oily but Tight in the Fall?

Hair Removal
Underarm Laser Hair Removal Cost: Do the Math

Tattoo removal
Laser Before a Cover-Up: How Many Sessions?

skin
큐어젯 다운타임, 다음 날 출근과 화장은 언제부터 될까요?